Special Aircraft Service

Please login or register.

Login with username, password and session length
Advanced search  
Pages: 1 ... 8 9 10 [11] 12   Go Down

Author Topic: Bedford OXC and Queen Mary trailer. Second part of the recovery set build.  (Read 15945 times)

0 Members and 1 Guest are viewing this topic.

Mission_bug

  • Modder
  • member
  • Offline Offline
  • Posts: 6062
Re: Bedford OXC and Queen Mary trailer. Second part of the recovery set build.
« Reply #120 on: February 29, 2024, 10:37:26 AM »

The image suggests that it is simply a protection bar for the radiator, the small bumper probably did not guarantee the safety of the front grille.   ;)


That is also certainly possible stanislao, the actual bumper is very small and would not appear to give much in the way of protection for either the radiator grill or the lights and the bar just about seems to cover both. ;)

Thank you very much for your input Stanislao, really appreciated. 8)

It could be I am overthinking what I see in the images and imagining all kinds of things it could be when in reality it is probably just that, protection plain and simple. :o

Take care and be safe.

Wishing you all the very best, Pete. ;D
Logged

Mission_bug

  • Modder
  • member
  • Offline Offline
  • Posts: 6062

Hello again guys, here we are for another installment of what seems like a never-ending build. :D

So then, where are we?

As mentioned last time the frame and bar at the front of the vehicle was next up, I am still unsure what its
exact purpose is but here goes with creating its shape using the line tool:


The part is not a solid assembly as such but has a recess on the inside that I tried to replicate:


Here the bar is added as well as the fixing that attaches it to the front and while I was at it some added
rings around the lights:


Close up of me trying to replicate the shape at the end that holds the bar in place:


The hole has been cut into the frame as seen in photographs and so it is nearly complete:


Mapping done:


The paint on to finish it off:


Into sim just to see if it all looked okay:


Next up is trying to make the fuel tanks, I actually used those from the Thorneycroft but adjusted their size
and thought that would do:


Here the arms that will eventually hold them in place are constructed:


Looking closer at the straps that support the tanks it was obvious that those used for the Thorneycroft were
quite different so that would entail making something new so on I went after discarding the original ones:


Here it is all coming together with new parts mapped:


Detailing the fixtures, these would be done for back and front although I could not tell from photographs
whether they were exactly the same I just duplicated what I made for the front:


The completed fixtures mapped and added to the tanks and awaiting some paint:


Making the cab steps, I just used a solid shape for these even though like the arms holding the tanks they
appeared to be hollow inside but I figured they will not be seen so went for easy, it was here I realised the
chassis was a little shallow when compared to the photograph but by this time everything has been made to
fit what I have so I left well alone. That is the trouble of not having blueprints with exact measurements but
anyway, on I went learning to live with what I had:


Last of all I added a registration plate, this uses the registration of a preserved vehicle at Blackpool Squires Gate Airfield,
I only found out about this recently even though I live only about seventeen miles down the road. :o That concluded the
build for this session and so here you see everything made so far painted up and finished:


And finally into the sim to see how it looked and make corrections if needed:


There are new links in the first post that now include the work described so far for those of you who might
want to see things in game. ;)


Take care and be safe.

Wishing you all the very best, Pete. ;D
Logged

Flying H

  • member
  • Offline Offline
  • Posts: 1346
  • "And you can fly, high as a kite if you want to..

Looking good!
Logged
And you can fly, high as a kite, if you want to.........

UberDemon

  • UberDemon/danzigzag
  • Modder
  • member
  • Offline Offline
  • Posts: 1435

Gotta figure out how to drive this beauty!
Logged
Best Regards, UberDemon/danzigzag, Get UQMG at SAS BAT Mission area.  www.uberdemon.net no longer exists.  (** Alienware Aurora R7 / i7-8700 3.20GHz / 16GB RAM / Win 10 x64 / NVIDIA GeForce GTX 1080 **)

Bots84

  • member
  • Offline Offline
  • Posts: 25

Ah so detailed like it alot Mission_bug
Logged

Mission_bug

  • Modder
  • member
  • Offline Offline
  • Posts: 6062

Hello guys, happy to know you are still following this thread and are happy with my efforts so far. ;)

The front end is now more or less complete, I am still not entirely happy with the shape of things but it
will get no better so I will just carry on, hopefully it is close enough, if I start trying to alter stuff again
then it will just get more frustrating and take longer to finish. Strangely it tends to look better in gmax
than in sim. :o :D

Anyway, onwards and upwards as they say, next is to try and sort out that temporary third wheel and
the remaining detail at the rear.

I have been trying to find a few images to help, trouble is they are all different but I will try and put
something together that looks close enough, here are a few of the images I have found so far:


Here is the vehicle I mentioned at Blackpool airport, I grabbed this off the internet, apparently the OXC tractor unit
and Queen Mary trailer were up for sale sometime in 2022, not sure what the current status of them both is though:


Here are two videos of the vehicle at Blackpool airfield, hopefully someone will be able to keep this piece of our heritage in good working order
for the future:

https://www.google.com/url?sa=t&source=web&rct=j&opi=89978449&url=https://www.facebook.com/lytham.spitfire/videos/the-bedford-oxc-and-queen-mary-trailer-of-hangar-42-blackpool-airport/574414146525302/&ved=2ahUKEwjD8eqv2L-FAxWbV0EAHUzPCNwQwqsBegQIFBAF&usg=AOvVaw3crc1ZKqM6RQeEw4I1GM5t

https://www.google.com/url?sa=t&source=web&rct=j&opi=89978449&url=https://www.facebook.com/lytham.spitfire/videos/for-sale-swap-or-part-exbedford-oxc-and-post-war-taskers-aircraft-recovery-trail/640312943848257/&ved=2ahUKEwjD8eqv2L-FAxWbV0EAHUzPCNwQwqsBegQIFhAF&usg=AOvVaw3_-Tun8TJX4EydG9n-6DaJ

Take care and be safe.

Wishing you all the very best, Pete. ;D
Logged

Piotrek1

  • member
  • Offline Offline
  • Posts: 2365
    • SAS IL BYTES BACK

Great work, Pete 8), and many Thanks for the update. :)

Best Regards,
Piotrek
Logged

Mission_bug

  • Modder
  • member
  • Offline Offline
  • Posts: 6062

Glad you are happy with the update Piotrek1. 8)

I was bored last night, could not find anything to watch and one of my sims crashed on one of the rare occasions I
actually fired it up to fly a short mission so I gave up on that and took to gmax instead. :D

Decided to make the rear mudguards as these will need space and that is dwindling on the two main templates
used so far so I needed to find space for those first before anything else and so got the basic shape sorted:


Here is the finished article awaiting mapping:


I think I try too much to map all the faces of the meshes and fit them on the template and for things like the brackets
that are duplicated many times and are an awkward shape it can take quite a considerable amount of space on the
template surface but I try to allow for possible camouflage patterns and if I map two faces together or you double up
on a part and use the same mapping that can make painting difficult later.
For that reason, I try and consider that at least when mapping the external faces as they could possibly show patterns, however,
we are now getting a little short of space so it is becoming more difficult. Now I am close to finalising the Bedford I have to squeeze
in the bits still left in order to make them fit or open up a separate texture so for now once I sort the mudguards hopefully much of
what is left can be found spaces for, at least I hope so.


Take care and be safe.

Wishing you all the very best, Pete. ;D
Logged

Mission_bug

  • Modder
  • member
  • Offline Offline
  • Posts: 6062

Hello guys, an update on the further progress of the Bedford for those hardy enough to still be following this. ;)

There are a number of brackets along the chassis that up until now I had avoided to concentrate on other
things but with the cab done it was time to move to the rear and start some of that detail and so with my
trusty line tool it began:


The parts are not solid but most likely pressed steel so have sides and top and so I gave that a go:


The parts were made separately and then attached together and any vertices welded as necessary and also
at this time, I realised the cab has a cut out that I would need to do where one of the parts fixes:


Mapping of the components begins and now gives you an idea of the inner shape:


Here we see the part in position, the cut out was altered again as you can see, I was not taking enough
notice to the proper shape earlier:


With the two rear brackets done and painted I turned my attention to the engine mounting bracket, this is
hidden under the cab but would be needed anyway for the engine when I eventually get to it. A photo
was added to a mesh plane to help me draw the shape with the line tool and get the shape close enough:


The shape coming along nicely:


This part was quite a complicated shape and so was constructed from top, sides and then the lip. Again the
component is not a solid so everything had to be flipped to make the inner shell and all joined together:


Here the outer shell has been mapped and was then cloned, that cloned mesh later had the faces flipped
to make the inner shell:
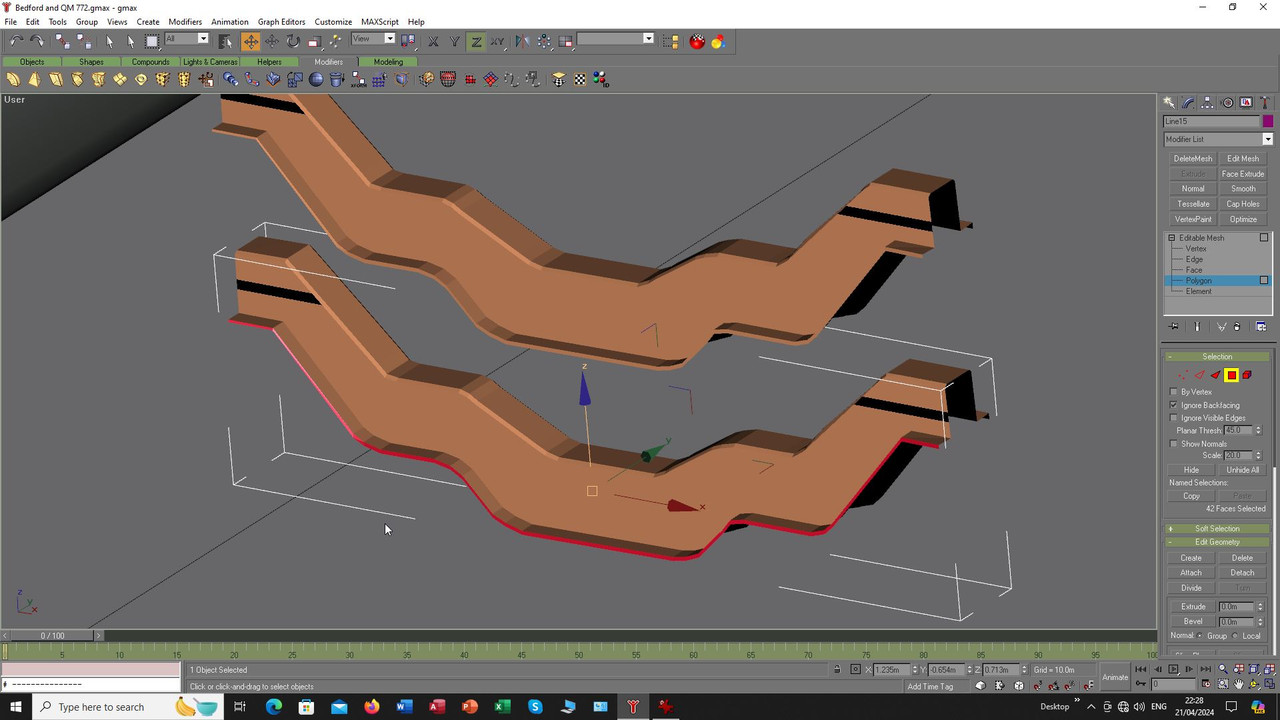


The inner and outer shell vertices are welded together, some of the cloned part was removed to avoid having
two lips the same before the remainder was welded:


Here you see the real thing and the mesh together to show you what it does on the real thing:


The bracket finished off with bolts and other fixtures before attention turns to trying to make a proper fifth
wheel, I called it third wheel in the last update. :-[ I have three different versions of these couplings and
went for the one in the image of the vehicle that is/was at Blackpool airfield, seventeen miles away from me
and I did not know until I saw a photograph and some videos from Facebook while doing an internet search. :o
Their photograph I felt offered the best detail so on I went first of all adding a cross piece at the rear:
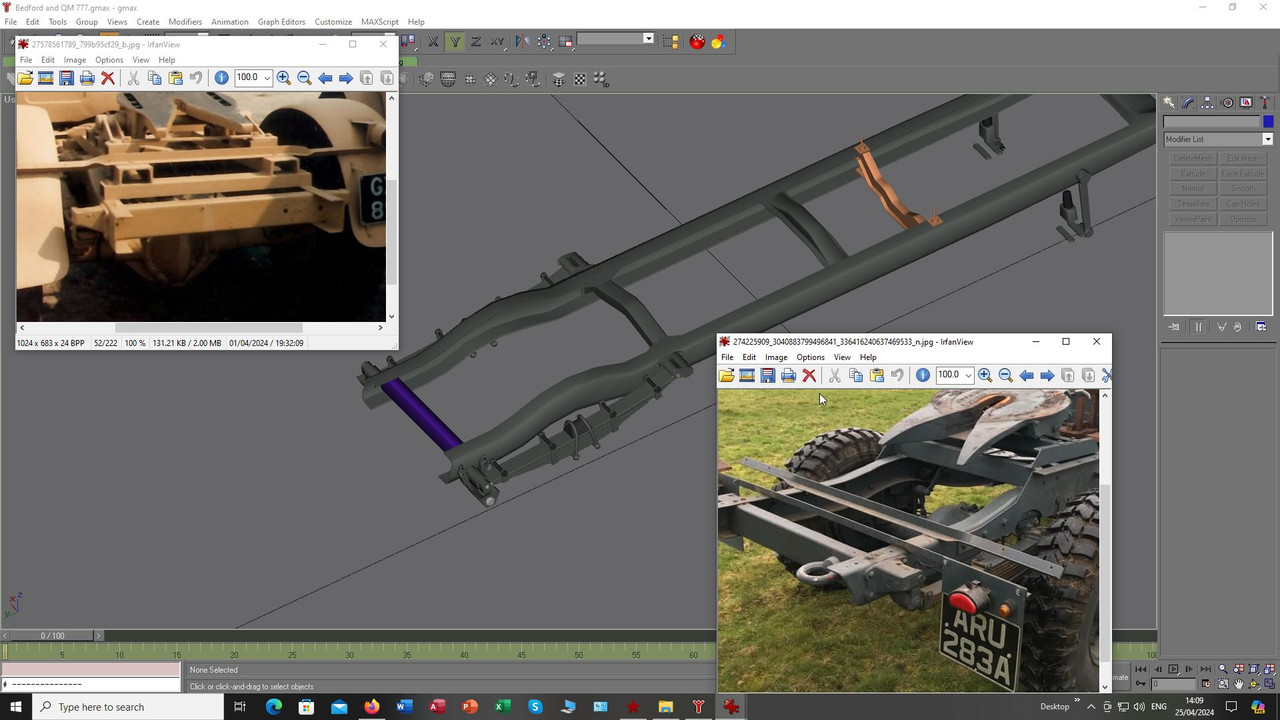


A close up view of that engine bracket once finished so you can see the extra bits added:


And on we go with replacing the earlier stand in fifth wheel:


The rear number plate and lights as well as the fixings to hold the mudguards in position:


A new plate was made for the fifth wheel and I tried as best I could to fabricate the parts that hold it all
together. From what I could tell the plate rolls back and forth on a pivot but I could not see exactly how
that was constructed so made a guess and at least made an attempt to replicate what was in the photograph
and will alter it if better information becomes available:


The finished item all mapped and painted:


I was not entirely sure what the next item was but as I had seen spare wheels led down here, I assumed
it was a bracket to hold that in position. A manual illustration I found later confirmed that but, in the mean
time, I began construction:


While that was made, I tried out the other parts in game to see how they looked:


Looking at the images of the wheel carrier I was not sure if it went straight across or if it bent down to one side
slightly and fixed under the other side of the chassis, in the end I just put it straight across:


Also added were the rails on the fuel tanks and then all the small bits and pieces of the carrier, I was originally
intending to make the wooden walkway that is portrayed in the Airfix model and will most likely build that later
with the option for a spare wheel either led down or stood against the back of the cab. I also have images now
showing fuel racks for the fuel cannisters used by the military so that and further trailer connectors could take
this build on even further:


Parts complete and the mapping done just awaiting painting:


And finally, into the sim it all goes:
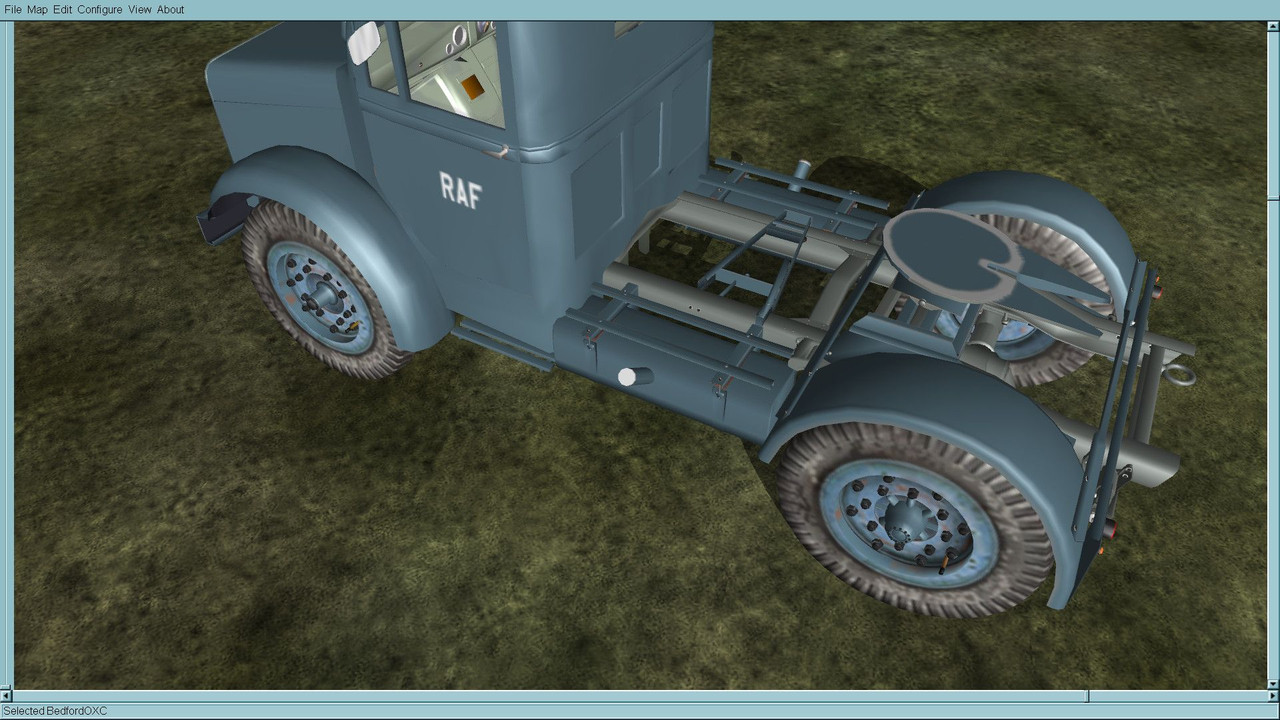


There are new links in the first page for the Bedford OXC and the template for those of you who might want
to add it into your own install. ;)


Take care and be safe.

Wishing you all the very best, Pete. ;D
Logged

Mission_bug

  • Modder
  • member
  • Offline Offline
  • Posts: 6062
Re: Bedford OXC and Queen Mary trailer. Second part of the recovery set build.
« Reply #129 on: October 17, 2024, 02:11:13 PM »

Hello guys, hope I find you all well. ;)

There is a big red warning notice at the top of my reply as I type, you guys probably cannot see though, has it really been that long since I did an update?  :o

Life issues and other things have kept me away from this for what seems forever, I was doing a Blender course, helping a couple of Argentine guys get their stuff into game behind the scenes and dealing with everyday life issues and medical problems and now on top of that I am migrating to a new PC and to say that is tortuous is an understatement.

I have been trying to clear my desk so to speak before the changeover just in case my modding and 3d stuff never works again. :D

The Blender course is done:


Would you live on my island?

I have now embarked on a Subsatnce Painter course as well because part of the reason for changing my old PC
was memory issues for both Blender and Substance as I try to understand more modern 3d projects and how they
are textured:


I also had an itch to scratch in plastic, I will never make anything to competition standards anymore
but seeing as it is not going out of the flat it will do, my eyes and fingers cannot cope anymore with
fine detailig:


The poor old Bedford meanwhile has languished in the shadows getting scant attention and so just in case gmax
never works again as I move over to the new machine I thought you might as well see what little had been done
up to now. ;)

Note: There is no new link available for those who might be following this for what I now post below,
that remains as it was.


So then, what Have I done?


The wooden base behind the cab is now built:


The fixture to hold the wheel in place was attempted and is as good as I can make out from photographs:


Mapped and painted, I tried to make the wooden area look like it has worn paint, more like a blue stain than paint
really but hopefully it does the job:


Next up was the engine block and all that goes with it:


Trying to build where the plugs will go:


A little mapping and painting:


Engine block painted up and moving to the small details:


While deciding to build the plugs I added a few bolts here and there:


Plugs still not made I started roughing out the gearbox area:


And finally for now trying to add some detail in the area:


Hopefully I might find a little time now to further develop this but if not at least you know it is still in work
even if at snails pace. ;)


Take care and be safe.


Wishing you all the very best, Pete. ;D


Logged

singüe

  • member
  • Offline Offline
  • Posts: 594
  • No por mucho amanecer, se madruga m
Re: Bedford OXC and Queen Mary trailer. Second part of the recovery set build.
« Reply #130 on: October 17, 2024, 04:28:54 PM »

Your patience and skills are awesome!
Logged

cgagan

  • SAS Team
  • member
  • Offline Offline
  • Posts: 5807
Re: Bedford OXC and Queen Mary trailer. Second part of the recovery set build.
« Reply #131 on: October 18, 2024, 01:34:11 AM »

Keep up the good work Pete!  8)
Logged
Pages: 1 ... 8 9 10 [11] 12   Go Up
 

Page created in 0.035 seconds with 27 queries.